
MQTT Integration allows to connect to external MQTT brokers, subscribe to data streams from those brokers and convert any type of payload from your devices to IoT Hub message format. Its typical use is whenever your devices are already connected to external MQTT broker or any other IoT platform or connectivity provider with MQTT based back-end.
Please review the integration diagram to learn more.
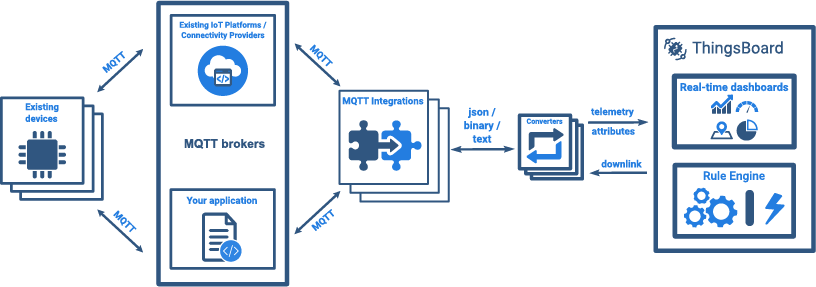
IoT Hub MQTT Integration acts as an MQTT client. It subscribes to topics and converts the data into telemetry and attribute updates. In case of downlink message, MQTT integration converts it to the device-suitable format and pushes to external MQTT broker. Pay attention: MQTT broker should be either co-located with IoT Hub instance or deployed in the cloud and have a valid DNS name or static IP address. IoT Hub instance that is running in the cloud can’t connect to the MQTT broker deployed in local area network.
This video is a step-by-step tutorial on setting up of MQTT Integration.
MQTT Integration Configuration
Also you may follow this guide, which discloses MQTT Integration to provide devices connection to the Platform and ability to send RPC commands to devices.
Prerequisites
In this tutorial, we will use:
- IoT Hub instance — iothub.magenta.at;
- MQTT broker, accessible by IoT Hub instance — broker.hivemq.com (port 1883);
- mosquitto_pub and mosquitto_sub MQTT clients to send and receive messages;
- an advanced device simulator for RPC simulation example.
Let’s assume that we have a sensor which is sending current temperature readings. Our sensor device SN-001 publishes it’s temperature readings to tb/mqtt-integration-tutorial/sensors/SN-001/temperature and it is subscribed to tb/mqtt-integration-tutorial/sensors/SN-001/rx to receive RPC calls.
We will send a message with temperature readings in a simple format: {"value":25.1}
Uplink and Downlink Converters
Before setting up an MQTT integration, you need to create an Uplink and a Downlink converters.
Uplink Converter is a script for parsing and transforming the data received by MQTT integration. Downlink Converter parses and transforms the data sent from IoT Hub to the format that is consumed by existing device(s).
Uplink Converter
To create an Uplink Converter go to Data Converters section and Click Add new data converter —> Create new converter. Name it “MQTT Uplink Converter” and select type Uplink. Use debug mode for now.
NOTE Although the Debug mode is very useful for development and troubleshooting, leaving it enabled in production mode may tremendously increase the disk space, used by the database, because all the debugging data is stored there. It is highly recommended to turn the Debug mode off when done debugging.
Now copy & paste the following script to the Decoder function section:
1
2
3
4
5
6
7
8
9
10
11
12
13
14
15
16
17
18
19
20
21
22
23
24
25
26
27
28
29
30
31
32
33
34
35
36
37
38
39
40
/** Decoder **/

// decode payload to string
var payloadStr = decodeToString(payload);
var data = JSON.parse(payloadStr);
var topicPattern = 'tb/mqtt-integration-tutorial/sensors/(.+)/temperature';

var deviceName =  metadata.topic.match(topicPattern)[1];
// decode payload to JSON
var deviceType = 'sensor';

// Result object with device attributes/telemetry data
var result = {
   deviceName: deviceName,
   deviceType: deviceType,
   attributes: {
       integrationName: metadata['integrationName'],
   },
   telemetry: {
       temperature: data.value,
   }
};

/** Helper functions **/

function decodeToString(payload) {
   return String.fromCharCode.apply(String, payload);
}

function decodeToJson(payload) {
   // convert payload to string.
   var str = decodeToString(payload);

   // parse string to JSON
   var data = JSON.parse(str);
   return data;
}

return result;
The purpose of the decoder function is to parse the incoming data and metadata to a format that IoT Hub can consume. deviceName and deviceType are required, while attributes and telemetry are optional. Attributes and telemetry are flat key-value objects. Nested objects are not supported.
Downlink Converter
The Downlink converter transforming outgoing RPC message and then the Integration sends it to external MQTT broker.
NOTE Even if you won’t send downlink RPC, you still need to create a dummy Downlink converter.
Create another converter with the name “MQTT Downlink Converter” and type Downlink. Leave the default script and click Add.
MQTT Integration Setup
Go to Integrations section and click Add new integration button. Name it MQTT Integration, select type MQTT, turn the Debug mode on and from drop-down menus add recently created Uplink and Downlink converters.
Specify host: broker.hivemq.com. Port: 1883. It is better to uncheck the Clean session parameter. Many brokers do not support sticky sessions, so will silently close the connection if you try to connect with this option enabled.
Add a Topic Filter tb/mqtt-integration-tutorial/sensors/+/temperature. You can also select an MQTT QoS level. We use MQTT QoS level 0 (At most once) by default.
Let’s leave the Downlink topic pattern by default, meaning that the Integration will take the metadata.topic and use it as the downlink topic.
Click Add to save the Integration.
Send Uplink message
Now let’s simulate the device sending a temperature reading to the integration:
1
mosquitto_pub -h broker.hivemq.com -p 1883 -t "tb/mqtt-integration-tutorial/sensors/SN-001/temperature" -m '{"value":25.1}'
Once you go to Device Groups -> All you should find a SN-001 device provisioned by the Integration. Click on the device, go to Latest Telemetry tab to see “temperature” key and its value (25.1) there.
Go back to your Integration and click on Events tab. There you’ll see the message consumed by the Integration. On Events tab of your MQTT Uplink converter there will be In, Out, and Metadata columns. The In and Metadata are the input for the data converter, and Out is the result.
Summary: the Uplink Data Converter defines provisioning of device and interpreting the input data. In our example we capture the device name from the topic (SN-001), set the default device type (sensor) and populate a telemetry value to it. In more complex cases you can write a script that will take this data from any part of data or metadata.
Send One-Way RPC to Device
This section describes how to send a one-way RPC request to the device using Control Widgets.
For your convenience you may follow this video to configure RPCs to device and receive simulated response via MQTT Integration.
Go to Dashboard Groups -> All section and create a new dashboard named MQTT Tutorial. Open the dashboard add an alias by clicking on Entity Aliases icon on the top-right.
Name the alias (Sensor, for example), select filter type “Single Entity”, type “Device” and choose our SN-001 sensor. Press Add and then Save.
Now Add New Widget, select Control Widgets from drop down menu and select any Knob Control widget.
On the Data field select created alias. Go to Advanced tab and set Minimum value to 15 and Maximum value to 45. Leave the rest by default. On the Settings tab set Number of digits after floating point to 0 and save your changes, close the widget edit dialog and save the changes to the dashboard.
Now go to Rule Chains section and open Root Rule Chain. Double-click on Message Type Switch node and enable the Debug mode on it. Now go back to your dashboard and turn knob a couple of times. In the Message Type Switch node on the Events tab you should then see incoming messages with the message type RPC_CALL_FROM_SERVER_TO_DEVICE and relation type RPC Request to Device. You can check out what data and metadata was sent by the Knob Control to the Rule Engine.
To make sensor performing this command you need RPC Request to Device type messages to be forwarded to the Downlink Data Converter. In the Root Rule Chain editor find the Integration Downlink node, drag and drop it to the rule chain. Name it MQTT Integration Downlink, select the MQTT Integration and click Add. Drag a connection from Message Type Switch node to MQTT Integration Downlink node with label “RPC Request to Device” and click add.
Go to Data Converters section, open your MQTT Downlink Converter:
1
2
3
4
5
6
7
8
9
10
11
12
13
14
15
16
17
18
19
20
21
/** Encoder **/

var value = parseInt(msg.params.replace(/"/g,""));
var data = {value: value}
// Result object with encoded downlink payload
var result = {

    // downlink data content type: JSON, TEXT or BINARY (base64 format)
    contentType: "JSON",

    // downlink data
    data: JSON.stringify(data),

    // Optional metadata object presented in key/value format
    metadata: {
        topic: 'tb/mqtt-integration-tutorial/sensors/'+metadata['deviceName']+'/rx'
    }

};

return result;
The script above removes quotes from msg.params value, which comes as quoted string, and parses it to integer. Then it builds a result object which is passed to the Integration. The result object structure should be followed: the data (the message payload sent to the external MQTT broker as-is) and the metadata (is used by Integrationin). As mentioned: the Integration downlink topic is configured to ${topic}, which means that the integration will take the metadata.topic and use it as the downlink topic.
Open the terminal window and execute the following command:
1
mosquitto_sub -h broker.hivemq.com -p 1883 -t "tb/mqtt-integration-tutorial/sensors/+/rx"
Go to the dashboard and turn the wheel again. In your terminal window you should receive series of the incoming messages sent by thew knob control widget:
1
2
{"value":32}
{"value":33}
Simulating of Two-Way RPC
Now try to simulate sending an RPC request to the device with recieving a response.
First you should modify Converters to send downlink messages to tb/mqtt-integration-tutorial/sensors/+/rx/twoway and receive device responses on tb/mqtt-integration-tutorial/sensors/+/rx/response
Change Downlink converter code to send messages to tb/mqtt-integration-tutorial/sensors/+/rx/twoway:
1
2
3
4
5
6
7
8
9
10
11
12
13
14
15
16
17
18
19
20
21
/** Encoder **/

var value = parseInt(msg.params.replace(/"/g,""));
var data = {value: value}
// Result object with encoded downlink payload
var result = {

    // downlink data content type: JSON, TEXT or BINARY (base64 format)
    contentType: "JSON",

    // downlink data
    data: JSON.stringify(data),

    // Optional metadata object presented in key/value format
    metadata: {
        topic: 'tb/mqtt-integration-tutorial/sensors/'+metadata['deviceName']+'/rx/twoway'
    }

};

return result;
Then prepare the Uplink Converter to receive the response messages. Go to “MQTT Uplink Converter” and paste the following code:
1
2
3
4
5
6
7
8
9
10
11
12
13
14
15
16
17
18
19
20
21
22
23
24
25
26
27
28
29
30
31
32
33
34
35
36
37
38
39
40
41
42
43
44
45
46
47
48
49
50
/** Decoder **/

// decode payload to string
var payloadStr = decodeToString(payload);
var data = JSON.parse(payloadStr);
var topicPattern = 'tb/mqtt-integration-tutorial/sensors/(.+?)/.*';

var deviceName =  metadata.topic.match(topicPattern)[1];
// decode payload to JSON
var deviceType = 'sensor';

// Result object with device attributes/telemetry data
var telemetry;
if (metadata.topic.endsWith('/temperature')) {
    // Transform the incoming data as before
    telemetry = getTemperatureTelemetry(data);
} else if (metadata.topic.endsWith('/rx/response')) {
    // Get the input value as is
    telemetry = data;
}

var result = {
   deviceName: deviceName,
   deviceType: deviceType,
   attributes: {
       integrationName: metadata['integrationName'],
   },
   telemetry: telemetry
};

/** Helper functions **/

function getTemperatureTelemetry(data) {
    return {temperature: data.value}
}

function decodeToString(payload) {
   return String.fromCharCode.apply(String, payload);
}

function decodeToJson(payload) {
   // covert payload to string.
   var str = decodeToString(payload);

   // parse string to JSON
   var data = JSON.parse(str);
   return data;
}

return result;
The script above is slightly different from what we had initially. It distinguishes between Post Telemetry requests and RPC call Responses, thus publishing different kind of output to Rule Engine.
You also must add a topic filter in your Integration in order to receive the RPC response messages: MQTT Integration -> Topic Filters -> Add Topic Filter. Add tb/mqtt-integration-tutorial/sensors/+/rx/response topic with the default QoS level and click save.
Now run device emulator. Notice, the mosquitto_pub and mosquitto_sub is not suffice, so please launch an advanced simulator:
1
python mqtt-client.py
Try to turn the knob wheel on a dashboard. In the terminal window you should have an output similar to :
Incoming message
Topic: tb/mqtt-integration-tutorial/sensors/SN-001/rx/twoway
Message: {"value":36}
This is a Two-way RPC call. Going to reply now!
Sending a response message: {"rpcReceived":"OK"}
Go to Device Groups and find rpcReceived telemetry value is OK in telemetry tab of your SN-001 device.
Next steps
- Getting started guides - These guides provide quick overview of main IoT Hub features. Designed to be completed in 15-30 minutes.
-
Data visualization - These guides contain instructions how to configure complex IoT Hub dashboards.
-
Data processing & actions - Learn how to use IoT Hub Rule Engine.
-
IoT Data analytics - Learn how to use rule engine to perform basic analytics tasks.
-
Hardware samples - Learn how to connect various hardware platforms to IoT Hub.
-
Advanced features - Learn about advanced IoT Hub features.