Overview
OPC UA Integration allows you to stream data from the OPC UA server to IoT Hub and converts the device payloads to the IoT Hub format.

Video tutorial
See video tutorial below for step-by-step instruction how to setup OPC-UA Integration.
OPC-UA Integration Tutorial
In this tutorial, we will configure the integration between IoT Hub and OPC-UA to get the Airconditioners data from the OPC UA C++ Demo Server and allow the user to switch on/off any Airconditioner using the Integration downlink feature.
Prerequisites
- Download and install the OPC UA C++ Demo Server.
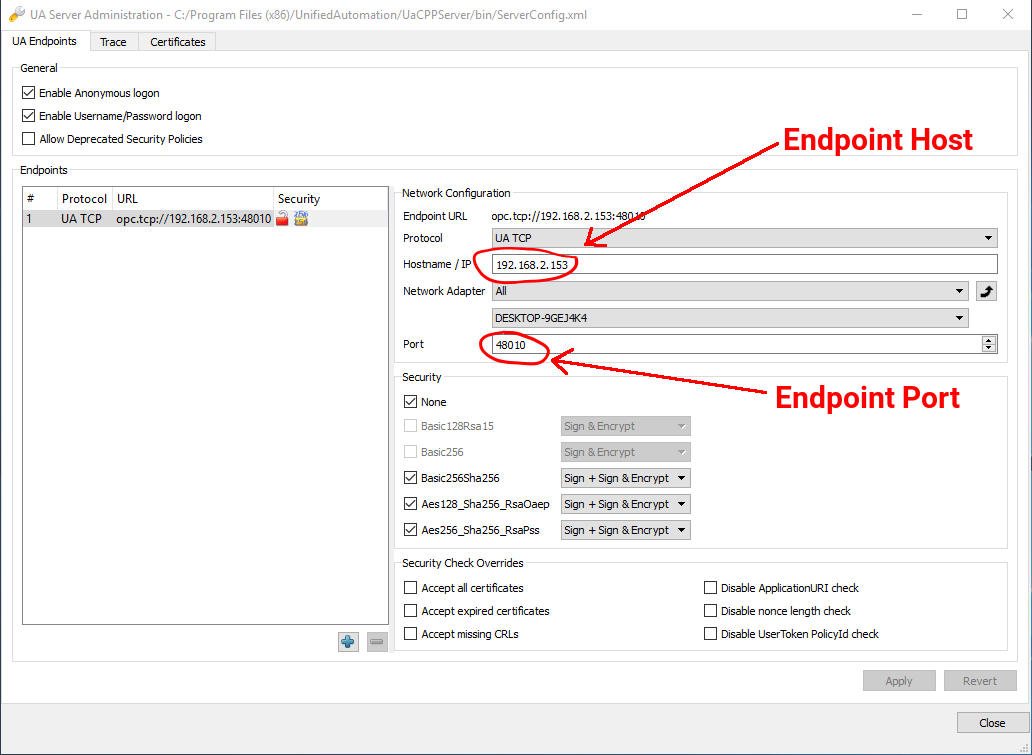
- After installation, launch the UA Admin Dialog.
- Verify that the Endpoint URL is set correctly and remember the values of Endpoint Host and Endpoint Port. These values will be needed during the OPC-UA Integration setup.
- Launch the UaCPPServer. The console dialog will open showing the server endpoints URLs.
IoT Hub setup
Uplink Data Converter
First, we need to create the Uplink Data converter that will be used for receiving the messages from the OPC UA server. The converter should transform the incoming payload into the required message format. The message must contain the deviceName and deviceType. These fields are used to submit the data to the correct device. If a device cannot not be found, a new device will be created. Here is how the payload from the OPC UA integration will look like:
Payload:
1
2
3
{
    "temperature": "72.15819999999641"
}
Metadata:
1
2
3
4
5
6
7
{
    "opcUaNode_namespaceIndex": "3",
    "opcUaNode_name": "AirConditioner_1",
    "integrationName": "OPC-UA Airconditioners",
    "opcUaNode_identifier": "AirConditioner_1",
    "opcUaNode_fqn": "Objects.BuildingAutomation.AirConditioner_1"
}
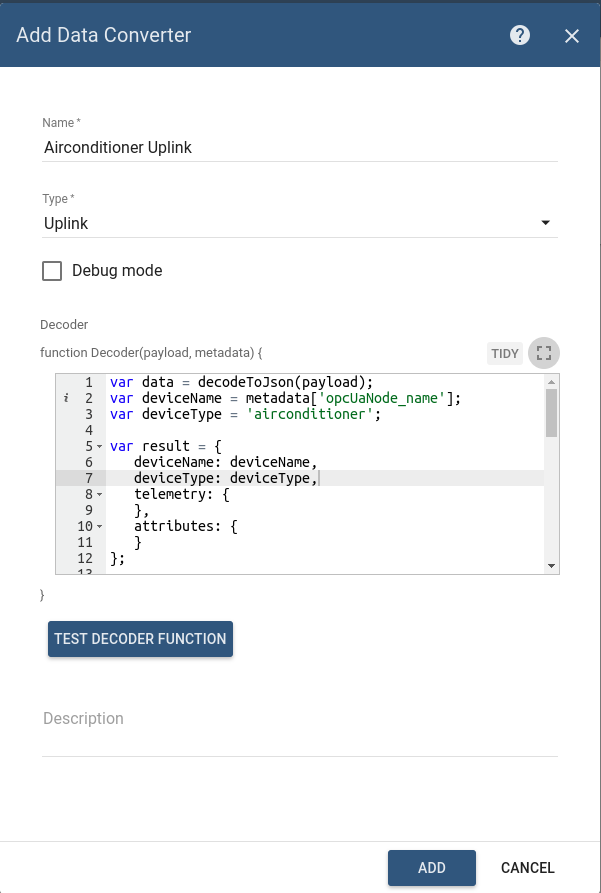
We will take the opcUaNode_name metadata value and map it to the deviceName and set the deviceType as airconditioner.
However, you can use another mapping in your specific use cases.
Also, we will retrieve the values of the temperature, humidity and powerConsumption fields and use them as device telemetries.
Go to the Data Converters and create a new uplink Converter using this function:
1
2
3
4
5
6
7
8
9
10
11
12
13
14
15
16
17
18
19
20
21
22
23
24
25
26
27
28
29
30
31
32
33
34
35
36
37
38
39
40
var data = decodeToJson(payload);
var deviceName = metadata['opcUaNode_name'];
var deviceType = 'airconditioner';

var result = {
   deviceName: deviceName,
   deviceType: deviceType,
   telemetry: {
   },
   attributes: {
   }
};

if (data.temperature) {
    result.telemetry.temperature = Number(Number(data.temperature).toFixed(2));
}

if (data.humidity) {
    result.telemetry.humidity = Number(Number(data.humidity).toFixed(2));
}

if (data.powerConsumption) {
    result.telemetry.powerConsumption = Number(Number(data.powerConsumption).toFixed(2));
}

if (data.state !== undefined) {
    result.attributes.state = data.state === '1' ? true : false;
}

function decodeToString(payload) {
   return String.fromCharCode.apply(String, payload);
}

function decodeToJson(payload) {
   var str = decodeToString(payload);
   var data = JSON.parse(str);
   return data;
}

return result;
Downlink Data Converter
For sending Downlink messages from the IoT Hub to the OPC UA node, we need to define a downlink Converter.
In general, the output from a Downlink converter should have the following structure:
1
2
3
4
5
[{
    "contentType": "JSON",
    "data": "{\"writeValues\":[],\"callMethods\":[{\"objectId\":\"ns=3;s=AirConditioner_1\",\"methodId\":\"ns=3;s=AirConditioner_1.Stop\",\"args\":[]}]}",
    "metadata": {}
}]
- contentType - defines how data will be encoded {TEXT | JSON | BINARY}. In case of OPC UA Integration, JSON is used by default.
- data - the actual data that will be processed by OPC UA Integration and sent to the target OPC UA nodes:
- writeValues - array of write values methods:
- nodeId - target node in OPC UA NodeId format (
ns=<namespaceIndex>;<identifiertype>=<identifier>) - value - value to write
- nodeId - target node in OPC UA NodeId format (
- callMethods - array of call methods:
- objectId - target object in OPC UA NodeId format
- methodId - target method in OPC UA NodeId format
- args - array of method input values
- writeValues - array of write values methods:
- metadata - not used in case of OPC UA Integration and can be empty.
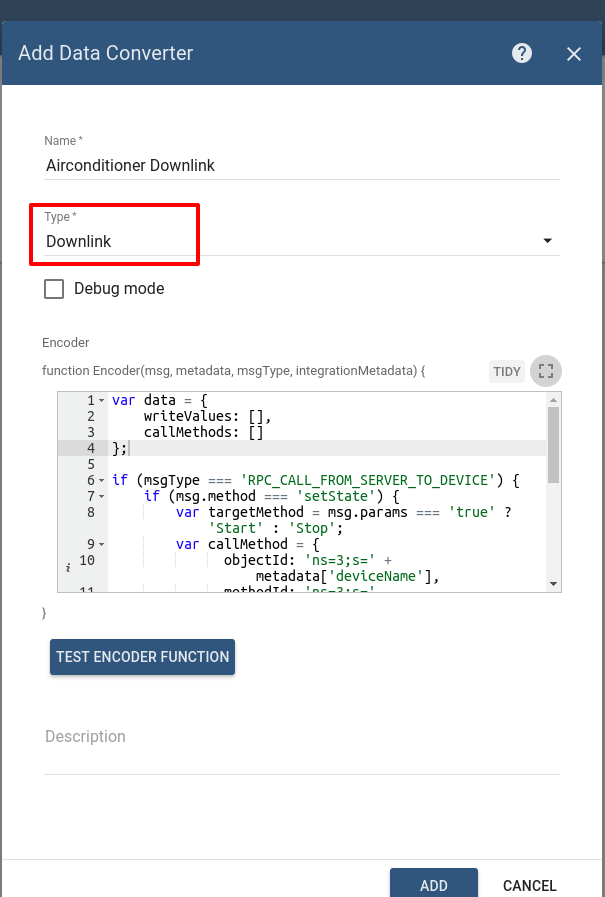
Go to Data Converters and create a new downlink Converter using this function:
1
2
3
4
5
6
7
8
9
10
11
12
13
14
15
16
17
18
19
20
21
22
23
24
var data = {
    writeValues: [],
    callMethods: []
};

if (msgType === 'RPC_CALL_FROM_SERVER_TO_DEVICE') {
    if (msg.method === 'setState') {
        var targetMethod = msg.params === 'true' ? 'Start' : 'Stop';
        var callMethod = {
              objectId: 'ns=3;s=' + metadata['deviceName'],
              methodId: 'ns=3;s=' +metadata['deviceName']+'.'+targetMethod,
              args: []
        };
        data.callMethods.push(callMethod);
    }
}

var result = {
    contentType: "JSON",
    data: JSON.stringify(data),
    metadata: {}
};

return result;
This converter will process the RPC command to the device using the method setState and a boolean params value to call the ‘Start’ or ‘Stop’ method of the Airconditioner.
Destination node is detected using the deviceName field of the incoming message metadata.
OPC-UA Integration
Next, we will create Integration with OPC UA server inside the IoT Hub. Open the Integrations section and add a new Integration with a type OPC-UA
- Name: OPC-UA Airconditioners
- Type: OPC-UA
- Uplink data converter: Airconditioner Uplink
- Downlink data converter: Airconditioner Downlink
- Application name: <empty> (client application name)
- Application uri: <empty> (client application uri)
- Host: Endpoint Host (see Prerequisites)
- Port: Endpoint Port (see Prerequisites)
- Scan period in seconds: 10 (how often to rescan OPC UA nodes)
- Timeout in milliseconds: 5000 (the timeout, in milliseconds, before failing a request to OPC UA server)
- Security: None (can be Basic128Rsa15 / Basic256 / Basic256Sha256 / None)
- Identity: Anonymous (can be Anonymous / Username)
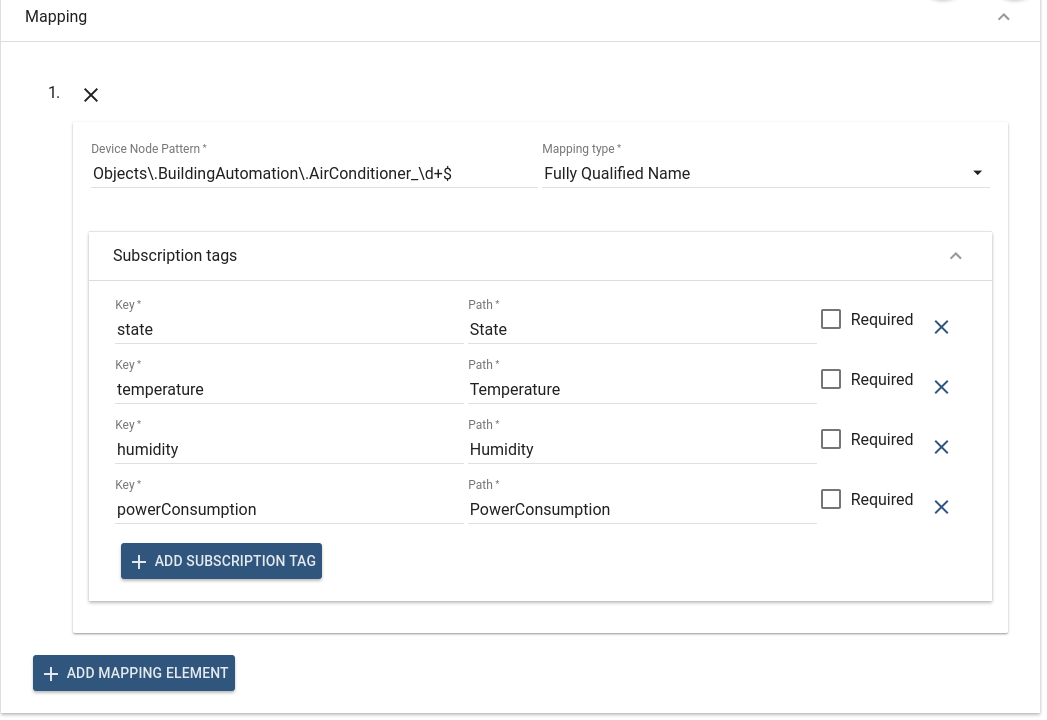
- Mapping:
- Device Node Pattern:
Objects\.BuildingAutomation\.AirConditioner_\d+$(regular expression used to match scanned OPC UA Node FQNs/IDs to device name.) - MappingType: Fully Qualified Name (can be Fully Qualified Name / ID)
- Subscription tags (list of node tags (Path) to subscribe with mappings to keys (Key) used in the output message):
- state - State
- temperature - Temperature
- humidity - Humidity
- powerConsumption - PowerConsumption
- Device Node Pattern:
Airconditioners Rule Chain
To demonstrate OPC-UA Integration and Rule Engine capabilities, we will create a separate Rule Chain to process the uplink and downlink messages related to the OPC-UA Integration.
Let´s create the Airconditioners Rule Chain.
- Download the airconditioners.json file.
- To import this JSON file, click the
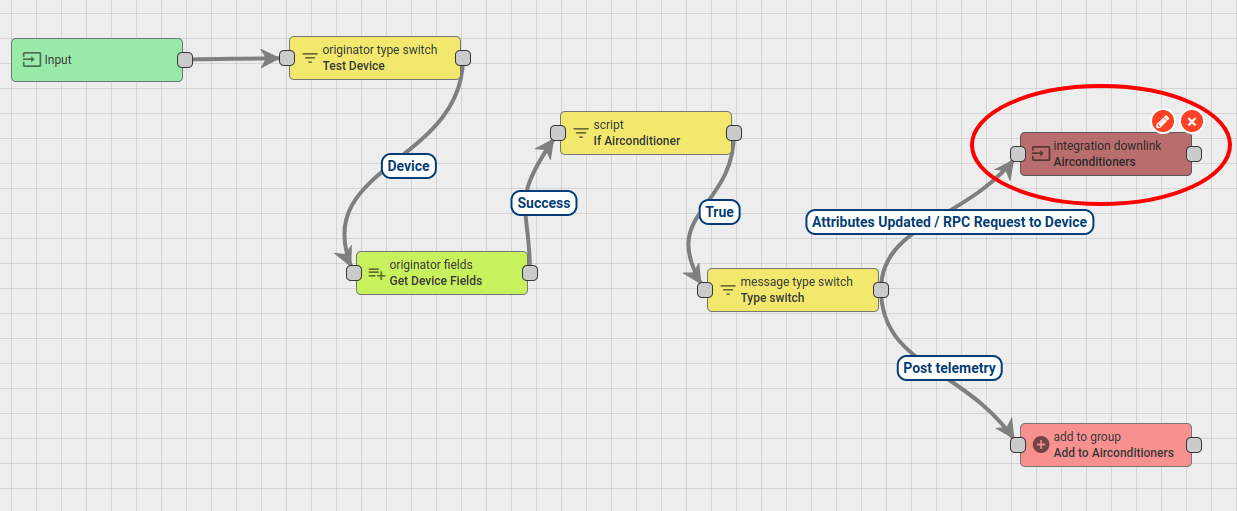
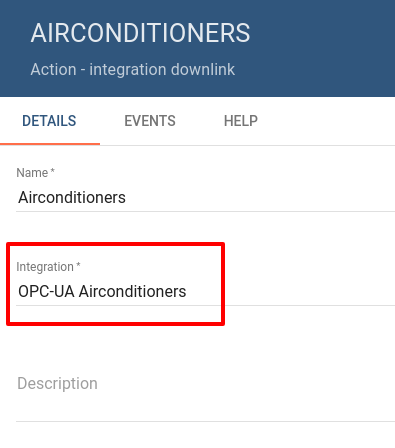
+button at the bottom right corner of the Rule Chains page and select the Import rule chain. - double-click on the Airconditioners integration downlink node and select OPC-UA Airconditioners in the Integrations field.
- Apply and save all changes.
- Open and edit the Root Rule Chain.
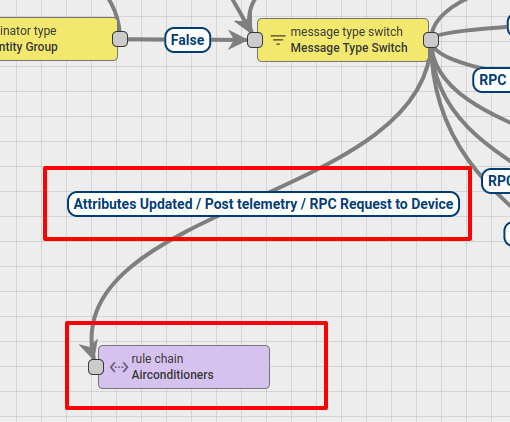
- Add the rule chain node.
- Select the Airconditioners Rule Chain and connect it to the Message Type Switch Node using the following link labels: Attributes Updated / Post telemetry / RPC Request to Device.
Airconditioners Dashboard
To visualize the Airconditioners data and test RPC commands, we will create the Airconditioners dashboard.
- Download the airconditioners_dashboard.json file.
- To import this JSON file, click the
+button at the bottom right corner of the Dashboards page and select Import dashboard.
Validation
To verify our integration,
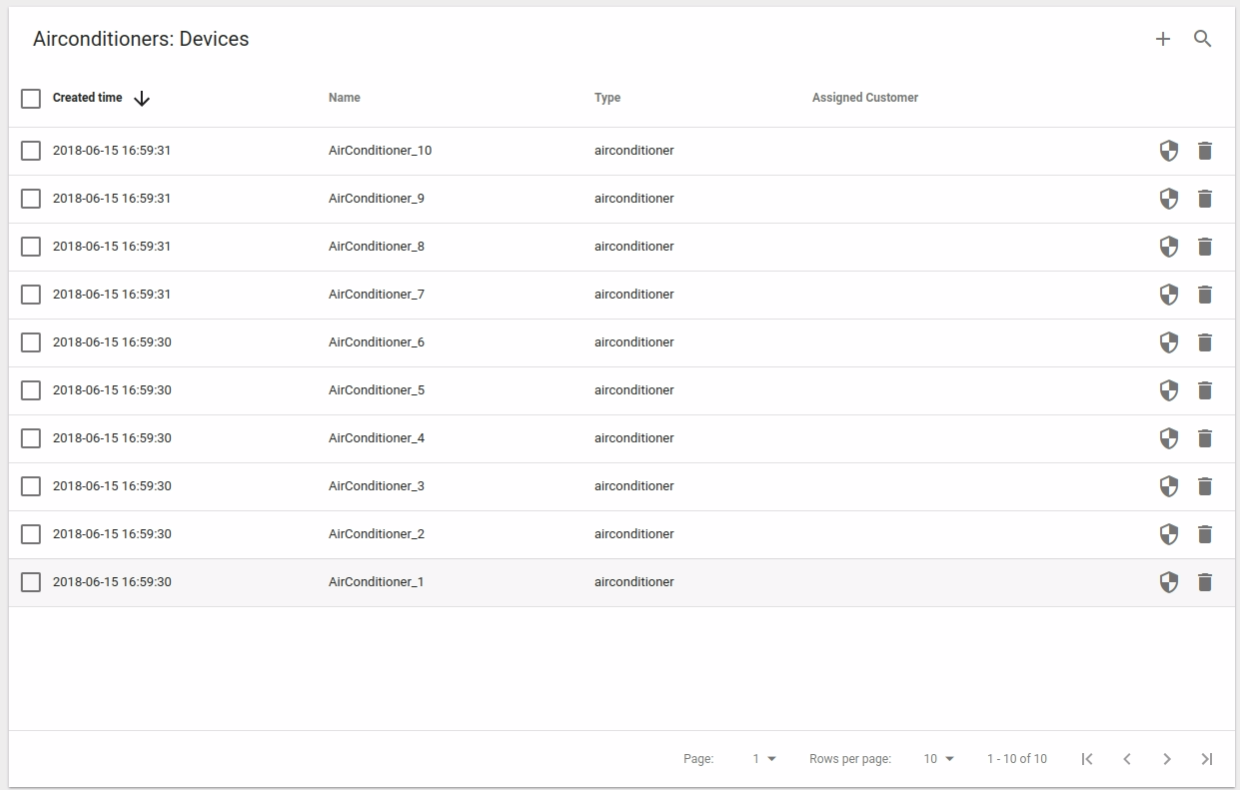
- Go to the Device groups page. You will see the Airconditioners group.
- When you open this group, you will see the 10 Airconditioner devices.
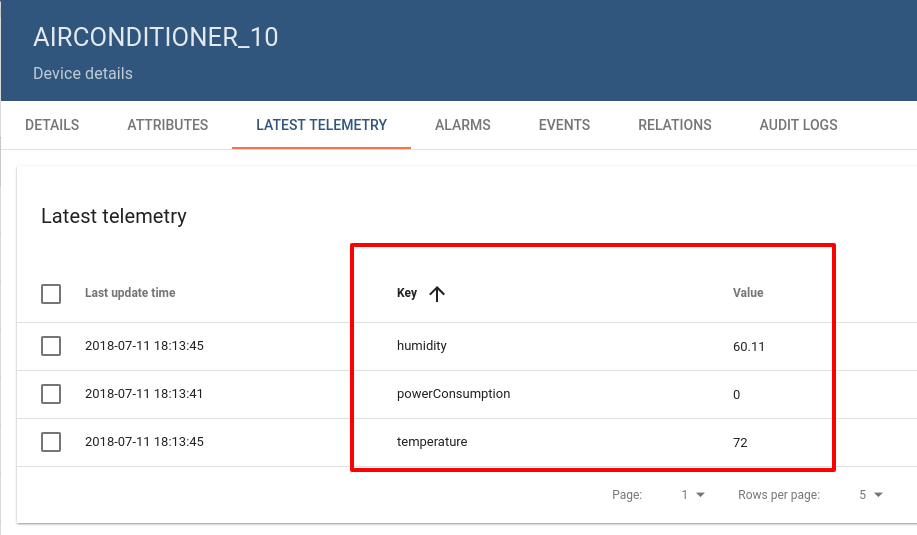
- Open the details of one of the Airconditioners and select the Latest Telemetry tab.
- You will see that telemetry values are frequently updated.
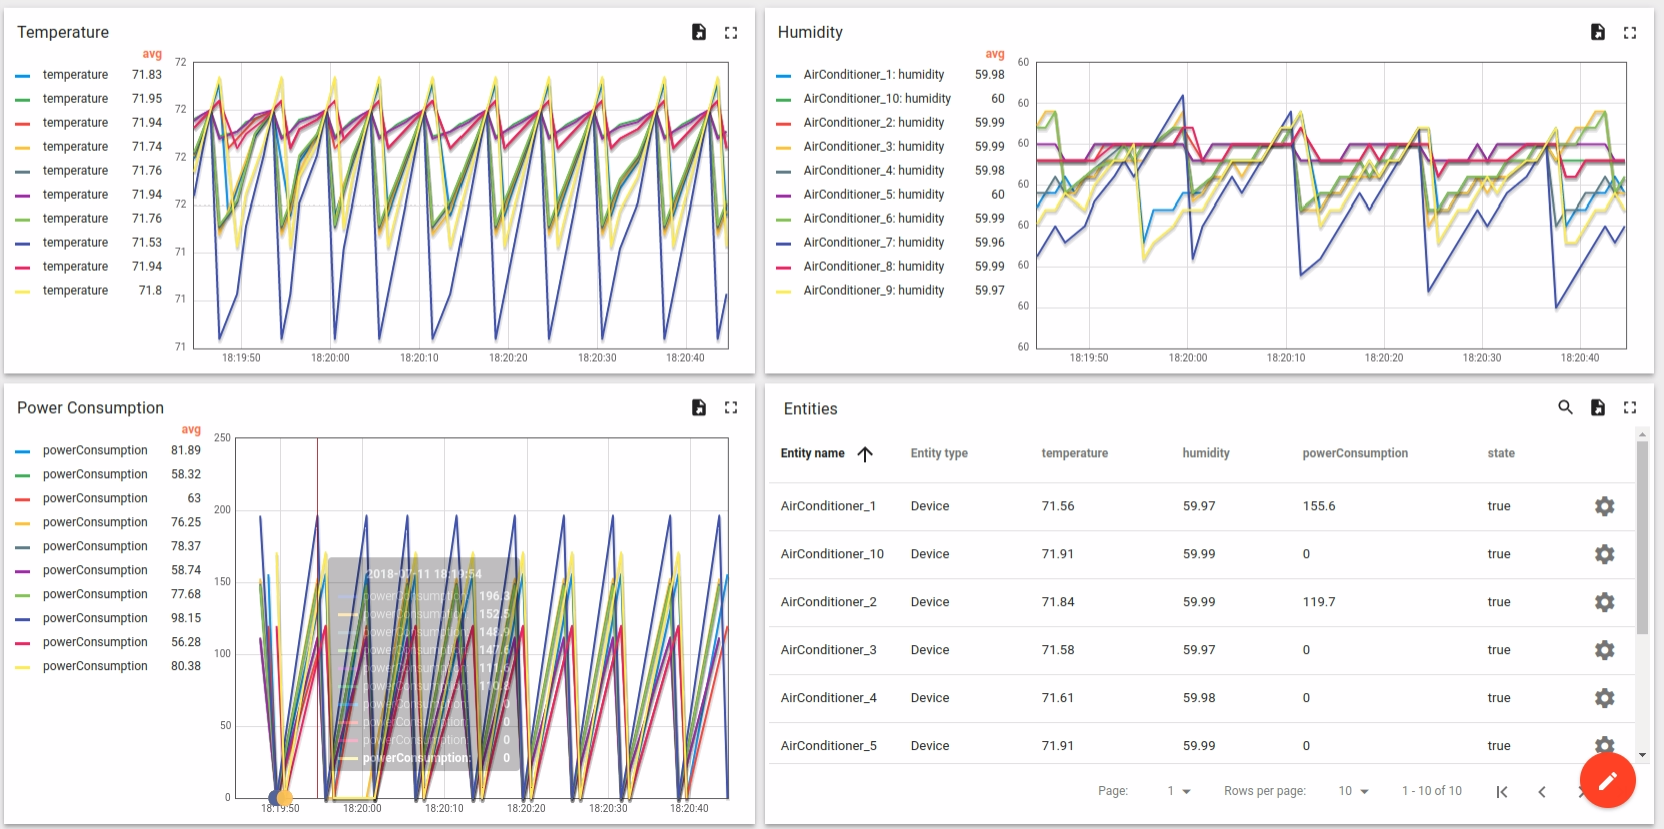
- Go to Dashboards and open the Airconditioners dashboard.
- You will see the telemetry till the last minute from all the 10 airconditioners.
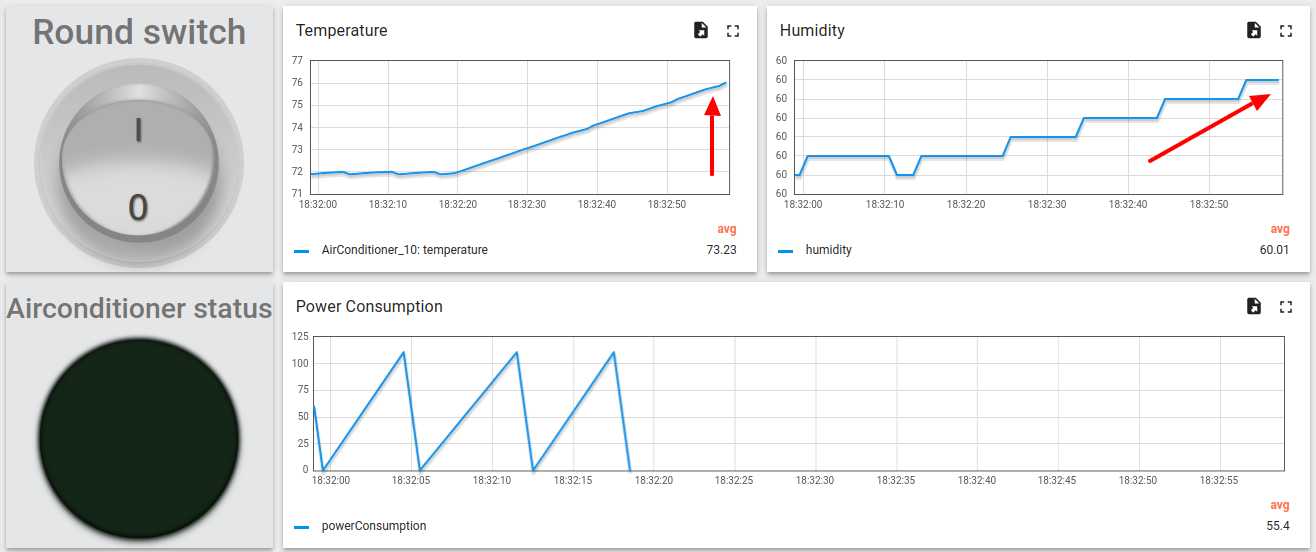
- Open the Airconditioner details page by clicking on the details button in the Entities widget.
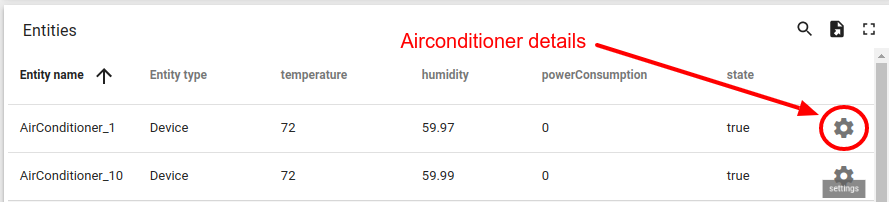
- You will find the Airconditioner status light green.
- Try to switch off the airconditioner by clicking on the On/Off Round switch.
- The Airconditioner status light will turn into grey, the temperature will start rising, the humidity will start increasing and the power consumption will stop.
See also
Next steps
- Getting started guides - These guides provide quick overview of main IoT Hub features. Designed to be completed in 15-30 minutes.
-
Data visualization - These guides contain instructions how to configure complex IoT Hub dashboards.
-
Data processing & actions - Learn how to use IoT Hub Rule Engine.
-
IoT Data analytics - Learn how to use rule engine to perform basic analytics tasks.
-
Hardware samples - Learn how to connect various hardware platforms to IoT Hub.
-
Advanced features - Learn about advanced IoT Hub features.